International Journal of Scientific & Engineering Research, Volume 6, Issue 4, April-2015 416
ISSN 2229-5518
Parametric Merit of Warm Deep Drawing Process for 1080A Aluminium Alloy: Validation through FEA
Balla yamuna, A.Chennakesava Reddy
ABSTRACT— In this present work, a statistical approach based on Taguchi and Anova techniques and fininte element analysis were adopted to determine the merit of sheet thickness, temperature, coefficient of friction and temperature on the formability of cups from 1080A aluminium alloy using warm deep drawing process. The experimental results were validated using a finite element software namely D-FORM. The Erichsen deep drawing test was conducted to study the formation of wrinkles in the cups. The thickness of sheet, temperature and strain rate would influence the effective stress. The major parameter the volume of the cup was the thickness of sheet. The damage in the cups were occurred in thin sheets, high coefficient of friction, high strain rate and high temperature.
Index Terms— warm deep drawing, 1080A aluminium, sheet thickness, temperature, strain rate, coefficient of friction, wrinkles,damage.
—————————— ——————————
1 INTRODUCTION
ANY investigations have been carried out to obtain an optimal blank shape that can be deformed into the near- net shape. Chung et al. [1] have proposed a direct de-
sign method based on an ideal forming theory to get an initial blank shape. But real forming conditions such as blank holder force, friction force, tool geometry are not considered. Shehata et al. [2] have demonstrated the formability can be improved using differential temperature rather than a uniform tempera- ture rise. Finch et al. [3] investigated the effect of warm form- ing on drawbility of both rectangular and circular cups from annealed and hardened aluminum sheet alloys. The results indicated significant improvement in the drawability in terms of cup height at a temperature of about 1500C even for the precipitation hardened alloys (like 2024-T4 and 7075-T6). To- ros et al. [4] have developed an analytical model to evaluate deep drawing process at elevated temperatures and under different blank holder pressure (BHP) and identified that blank temperature, punch speed, BHP, and friction are the main factors that influence formability. Jeyasingh et al. [5] have carried out investigations on failures of hydroforming deep drawing processes. The punch deforms the blank to its final shape by moving against a controlled pressurized fluid, which acts hydrostatically via a thin rubber diaphragm. As a result of the controllable backup pressure, a favorable pres- sure path, with respect to the punch travel, can be sought in order to delay the premature failures. The failure by rupture results from an excessive fluid pressure, while wrinkling re- sults from insufficient fluid pressure. The range of pressure in between these two boundaries, give the working zone. Reddy et al. [6] have carried out the experimental characterization on the warm deep drawing process of extra-deep drawing (EDD)
————————————————
• Balla yamuna, is currently pursuing masters degree program in advanced manufacturing systems,JNT University, Hyderabad, India, PH-
+919700385065, E-mail: yamuna.balla.mech09@gmail.com
• A.Chennakesava Reddy, Professor, JNT University, Hyderabad, India
steel. The results of the experimentation conclude that the ex- tent of thinning at punch corner radius is lower in the warm deep-cup drawing process of EDD steel at 2000C. Reddy et al. [8] in their work have simulated that the cup drawing process with an implicit finite element analysis. The effect of local thinning on the cup drawing has been investigated. The thin- ning is observed on the vertical walls of the cup. Reverse su- perplastic blow forming of a Ti-6Al-4V sheet has been simu- lated using finite element method to achieve the optimized control of thickness variation [9]. The strain hardening rate and fracture toughness are usually affected by strain rate and temperature. Reddy [10] has used taguchi technique which can save the cost of experimentation to optimize the extrusion process of 6063 alumimium alloy. Industrial pure aluminum can not be heat strengthened, through increased intensity of cold deformation, the only form of heat treatment is anneal- ing. 1080 is highly resistant to chemical attack and weathering. It is easily worked and welded. This is excellent for chemical processing equipment and other uses where product purity is important, and for metal pressings of all types where ductility is critical also, it is a soft workable alloys having high purity which gives excellent corrosion resistant.
The objective of the present work is to optimize the warm
deep drawing process of 1080A aluminium alloy using taguchi
technique. In this present work, a statistical approach based on
Taguchi and Anova techniques was adopted to determine the merit of each of the process parameter on the formability of deep drawn cup. All the experimental results have been veri- fied using D-FORM software.
2 MATERIALS AND METHODS
1080A aluminium alloy was used to fabricate deep drawing cups. The tensile and yield strengths of this alloy are 120 and
80 MPa respectively. The elastic modulus is 70 GPa. The pois- son’s ratio is 0.33. The percent elongation is 8. The control pa-
IJSER © 2015 http://www.ijser.org
International Journal of Scientific & Engineering Research, Volume 6, Issue 4, April-2015 417
ISSN 2229-5518
rameters are those parameters that a manufacturer can control the design of the product, and the design of process. The levels chosen for the control parameters were in the operational range of 1080A aluminum alloy using deep drawing process. Each of the three control parameters was studied at three lev- els. The chosen control parameters are summarized in table 1.
TABLE 1
Control Parameters and Levels
The drawing punches must have corner radius exceeding three times the blank thickness (t). However, the punch radius should not exceed one-fourth the cup diameter (d).
3t<Punch radius < d/4 (6) For smooth material flow the die edge should have gener- ous radius preferably four to six times the blank thickness but never less than three times the sheet thickness because lesser radius would hinder material flow while excess radius would reduce the pressure area between the blank and the blank

Factor Symbol Level–
Level–
Level–
holder. The corner radius of the die can be calculated from the following equation:
Coefficient of Fric- tion
Strain rate D 100 500 1000
ing and thinning of walls of the cup inevitable. The space for
drawing is kept bigger than the sheet thickness. This space is
called die clearance.
The orthogonal array (OA), L9 was selected for the present work. The parameters were assigned to the various columns of O.A. The assignment of parameters along with the OA matrix is given in table 2.
TABLE 2
Orthogonal Array (L9) and control parameters


Treat No. A B C D
1 1 1 1 1
2 1 2 2 2
3 1 3 3 3
4 2 1 2 3
5 2 2 3 1
6 2 3 1 2
7 3 1 3 2
8 3 2 1 3

9 3 3 2 1

Clearance, 𝑐 = 𝑡 ± 𝜇√10𝑡 (9)
The sheets of 1080A aluminium alloy were cut to the re-
quired blank size. The blank specimens were heated in a muf-
fle furnace to the desired temperature as per the design of ex-
periments. The blank pressure was caluculated using equ (5).
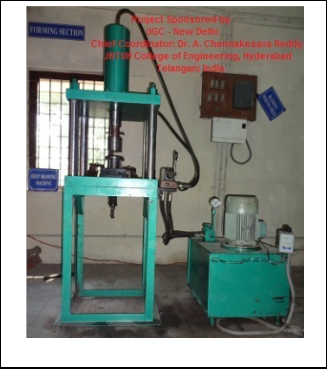
The cups were fabricated using hydrolically operated deep
drawing machine as shown in figure 1.

2.1 Fabrication of Deep Drawn Cups
The blank size was calculated by equating the surface area of the finished drawn cup with the area of the blank. The diame- ter of the blank is given by:


𝐷 = √𝑑2 + 4𝑑ℎ for d/r > 20 (1)


𝐷 = �(𝑑 − 2𝑟)2 + 4𝑑(ℎ − 𝑟) + 2𝜋𝑟(𝑑 − 0.7𝑟) for 2d/r < 10 (4)
where d is the mean diameter of the cup (mm), h is the cup height (mm) and r is the corner radius of the die (mm).
The force required for drawing depends upon the yield strength of the material σy , diameter and thickness of the cup:
Drawing force, 𝐹𝑑 = πdt⌈𝐷/𝑑 − 0.6⌉𝜎𝑦 (5)
where D is the diameter of the blank before operation (mm), d
is the diameter of the cup after drawing (mm), t is the thick-
ness of the cup (mm) and σy is the yield strength of the cup material (N/mm2).
Fig. 1. Deep drawing machine (hydraulic type).
2.2 Conduction of Tests
The following tests were conducted on the materials used in the present work:
• Tensile test to find true stress-true strain curve
• Volume of the deep drawn cups
• Thickness of deep drawn cups
• Inspection of fracture and wrinkle formation on the cups
IJSER © 2015 http://www.ijser.org
International Journal of Scientific & Engineering Research, Volume 6, Issue 4, April-2015 418
ISSN 2229-5518

• Erichsen deep drawing test
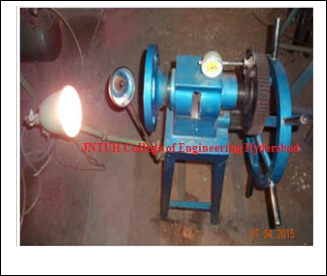
The Erichsen deep drawing test (figure 2) was conducted
for testing the deep drawing quality and ear forming tendency
on 1080A aluminium alloy sheet. The test consisted of forming
an indentation by pressing a punch with a spherical end
against a test piece clamped between a blank holder and a die,

until a through crack appears. The depth of the cup was measured.
Fig. 2. Erichsen deep drawing tester.
Note: a is the thickness of the sheet, h is the depth of the indentation during the test and IE is the Erichsen cupping index.
3 FINITE ELEMENT MODELING AND ANALYSIS
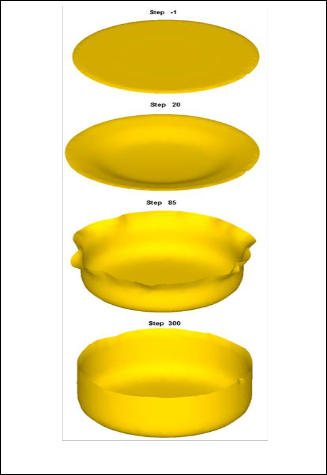
The finite element modeling and analysis was carried using D- FORM 3D software. The circular sheet blank was created with desired diameter and thickness. The cylindrical top punch, cylindrical bottom hollow die were modeled with appropriate inner and outer radius and corner radius [10]. The clearance between the punch and die was calculated using equ (9). The sheet blank was meshed with tetrahedral elements [11]. The modeling parameters of deep drawing process were as fol- lows:
Fig. 3. Deep drawing operation using D-FORM 3D software.
Number of elements for the blank: 6767 tetrahedron
Number of nodes for the blank: 2375
Top die polygons: 9120
Bottom die polygons: 9600
The initial position of the die, punch, blank holder is shown
in figure 3. The contact between blank and punch, die and blank holder were coupled as contact pair. The mechanical interaction between the contact surfaces was assumed to be frictional contact. The finite element analysis was chosen to find the effective stress, effective strain, volume of the cup, and damage of the cup. The finite element analysis was con- ceded to run using D-FORM 3D software according to the de- sign of experiments for the purpose of validating the results of experimentation.
Fig. 4. 1080A aluminum alloy tensile stress-strain curves.

4 RESULTS AND DISCUSSION
The experiments were scheduled on random basis to accom- modate the manufacturing impacts (like variation of tempera- ture, pressure). Two trials were carried out for each experi- ment.
The specifications of the tensile test specimen are diameter,
IJSER © 2015 http://www.ijser.org
International Journal of Scientific & Engineering Research, Volume 6, Issue 4, April-2015 419
ISSN 2229-5518

12.7 mm and gage length 203.2 mm. The properties are as fol- lows: nominal tensile strength, 126 MPa, true tensile strength,
154 MPa, nominal yield strength (0.2% offset), 83 MPa, and
elongation (in 50.8 mm), 8.0% A log-log plot of the stress- strain curve would yield a slope (n) of 0.21 in the area of uni- form plastic deformation (figure 4).
3.1 Influence of Process Parameters on Effective Stress Table 3 gives the ANOVA (analysis of variation) summary of raw data. The Fisher’s test column establishes all the parame-
ters (A, B, and D) accepted at 90% confidence level. The per-
cent contribution indicates that the thickness parameter, A
contributes 25.01% of variation, B (temperature) assists 59.50%
of variation, and D (strain rate) contributes 13.92% of variation
on the effective tensile stress.
TABLE 3
ANOVA summary of the effective stress


Source Sum 1 Sum 2 Sum 3 SS v V F P
A | 753.93 | 689.57 489.76 | 6325.09 | 2 | 3162.55 649.07 | 25.01 |
B 879.99 585.92 467.36 15044.10 2 7522.05 1543.81 59.50 |
C | 650.33 | 607.90 675.03 | 384.23 | 2 | 192.12 | 39.43 | 1.51 |
D | 532.01 | 733.60 667.65 | 3521.60 | 4 | 880.40 | 180.69 | 13.92 |
Error | | | 4.87 | 7 | 0.70 | 0.14 | 0.06 |
T 2816.25 2616.98 2299.80 25279.89 17 100.00 |

Note: SS is the sum of square, v is the degres of freedom, V is the variance, F is the Fisher’s ratio, P is the percentage of contribution and T is the sum squares due to total variation.

Fig. 6. Influence of temperature on the effective stress.
Fig. 7. Influence of strain rate on the effective stress.
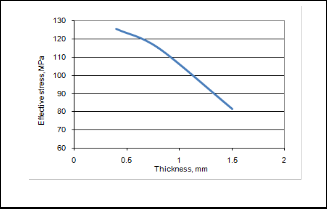
Fig. 5. Influence of sheet thickness on the effective stress.

The influence of thickness on the effective stress is shown fig- ure 5. The effective stress of the cups decreases from 125.66 to
81.63 MPa with increasing thickness of sheet. This is practical as the denominator component of ‘stress = force/area’ in- creases the stress value decreases. The effective stress decreas- es from 146.66 to 77.89 MPa with increasing temperature from
30 to 5000C (figure 6). This is owing to the softening of materi-
al with an increase in the temperature. The maximum forming
load decreases as the working temperature is increased. The
maximum forming load is found to decrease from 13KN to
5KN over the working temperature range 1000C<T< 500 0C.
The influence of strain rate on the effective stress is shown in figure 7. It is observed that the effective stress (122.27 MPa) is maximum at the strain rate of 500 s-1.
The FEA results of effective stress are shown in figure 8. The test condtions (treat no. 1, 2 &3) of thickness, 0.40 mm have yielded the effective stresses of 145, 125 and 105 MPa respectively with fracture in the cups. In all the cases the thickness, strain rate and temperature have played a dominant role. Kobayashi and Dodd [13] proposed the following equa- tion with a term for temperature softening:
𝜎 = 𝐾𝜖 𝑛 𝜖̇𝑚 (1 − β∆T) (10)
where σ is the flow stress, ε the strain, n the work-hardening
coefficient, έ the strain rate, m the strain-rate sensitivity index,
T the temperature and K and β are constants.
3.2 Influence of Process Parameters on Effective Strain
The ANOVA summary of the effective strain is given in table
4. The Fisher’s test column ascertains all the parameters (A, B,
C, D) accepted at 90% confidence level influencing the varia-
tion in the elastic modulus. However, the major contributions
24.91% 34.95% are of sheet thickness and temperature towards
variation in the effective strain. The other influencial parame-
ters are coefficient of friction (19.50%) and strain rate (21.20%).
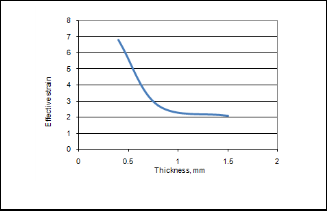
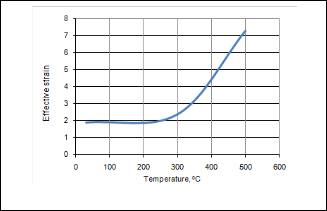
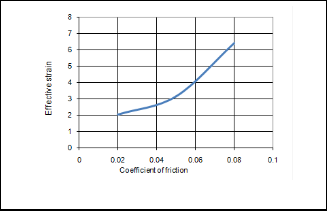
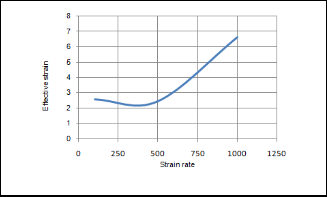
The effective strain decreases with an increase in the thick-
ness of blank sheet as shown in figure 9 where as it increases
with with increase of temperature, coefficient of friction and
strain rate. The characteristic equation that describes super-
IJSER © 2015 http://www.ijser.org
International Journal of Scientific & Engineering Research, Volume 6, Issue 4, April-2015 420
ISSN 2229-5518
plastic behavior is usually written as 𝜎 = 𝐾𝜖̇𝑚 m, [14] where σ
is the flow stress, K is a material constant, έ is the strain rate
and m is the strain-rate sensitivity index of the flow stress. The
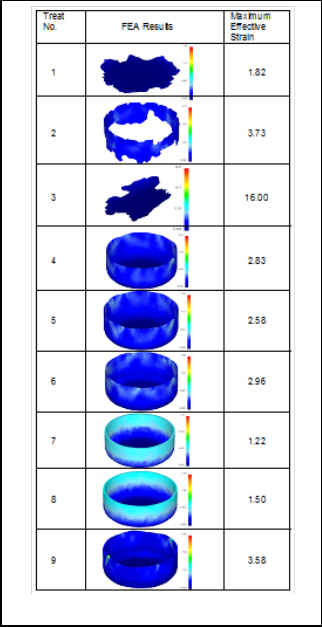
m-value is a function of the forming parameters, such as the strain rate and the temperature, and is also connected with the microstructural characteristics. The FEA results of effective stress are shown in figure 13. The failure of cups under treat ments 1, 2 and 3 were on account of thickness and tempera- ture dependency for the fracture strain was evidently strain rate sensitive.
ANOVA summary of the effective strain

Source Sum 1 Sum 2 Sum 3 SS v V F P

A 40.87 16.40 12.47 78.95 2.00 39.48 86.91 24.91
B 11.44 14.35 43.95 107.88 2.00 53.94 118.74 34.05
C 12.27 18.98 38.49 61.84 2.00 30.92 68.07 19.5
D 15.45 14.64 39.65 67.33 4.00 16.83 37.05 21.2
Error 0.45 7.00 0.06 0.13 0.34
17.0

T

80.03 64.37 134.56 316.45
0 100


Fig. 9. Influence of thcikness on the effective strain.

Fig. 10. Influence of temperature on the effective strain.
Fig. 8. Influence of process parameters on the effective stress.
TABLE 4
Fig. 11. Influence of friction on the effective strain.
IJSER © 2015 http://www.ijser.org
International Journal of Scientific & Engineering Research, Volume 6, Issue 4, April-2015 421
ISSN 2229-5518

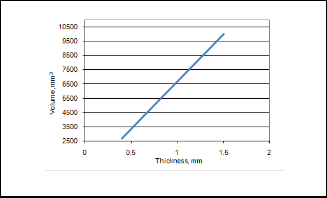
accepted at 90% confidence level influencing the variation in the flexural strength. The percent contribution indicates that thickness of sheet gives 100%of variation and rest of the pa- rameters has negligible influence of variation. The volume of cup increases with an increase in the thickness of sheet as shown in figure 14.
Fig.12. Influence of strain rate on the effective strain.
TABLE 5

ANOVA summary of the volume of cup


Fig. 14. Influence of thickness on the volume.
Fig. 13. Influence of process parameters on the effective strain.

3.4 Influence of Process Parameters on Damage of Cup The ANOVA summary of specific wear rate is given in table 6. The Fisher’s test column ascertains the parameters (A, B, C
and D) accepted at 90% confidence level influencing the varia-
tion in the impact strength. The percent contribution indicates that the thickness of the sheet only contributes half (28.40%) of the variation, parameter, T (temperature) aids 36.65% of varia- tion, coefficient of friction contributes 15.97% of variation and strain rate contributes 18.73% of variation.
TABLE 6

ANOVA summary of the damage of cup
3.3 Influence of Process Parameters on Volume of Cup
The ANOVA summary of volume is given in table 5. The Fish- er’s test column ascertains all the parameters (A, B, C, and D)
IJSER © 2015 http://www.ijser.org
International Journal of Scientific & Engineering Research, Volume 6, Issue 4, April-2015 422
ISSN 2229-5518
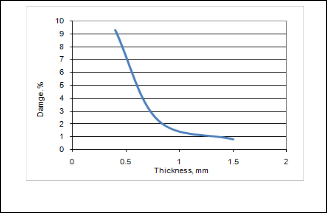
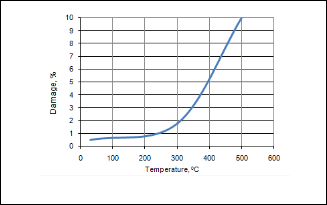
The effect of thickness on the damge of cup is shown in fig- ure 15. The damage decreases with an increase in the thickness of the sheet. As the temperature increases the damage increas- es (figure 16) because of softening of the material. In the case of friction between the piece and the dies, the increase of the coefficient of friction determines the wrinkling to reduce, but high values of the coefficient can cause cracks and material breakage [12]. The effect of coefficient of friction on the dam- age of cups is shown in figure 17. As the friction increases the damage also increases. The damage in the cups increases with an increase in the strain rate as shown in figure 18.
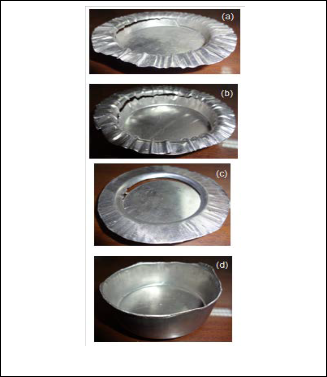
case of the thin sheets, although the radial extension stress of the flange is relatively high, the tangential compression stress can lead to the risk of its wrinkling (figure 19a), a risk which is very likely to appear when the difference between the outer diameters of the blank and the finished piece is big and the sheet thickness is small. It is observed form figure 17 that the damage in the cup increases with an increase in the coefficient of friction. It was observed that if the friction forces are low, the wrinkling is more pronounced, but if the friction forces are too high the material can break.

Fig. 18. Influence of strain rate on the damage of cup.


Fig. 15. Influence of thickness on the damage of cup.
Fig. 16. Influence of temperature on the damage of cup.

Fig. 19. Experimentally drawn cups
Fig. 17. Influence of friction on the damage of cup.
In the case of deep-drawing, under the effect of the defor- mation force, the blank is subjected to a tangential compres- sion stress and a radial extension stress. For instance, in the
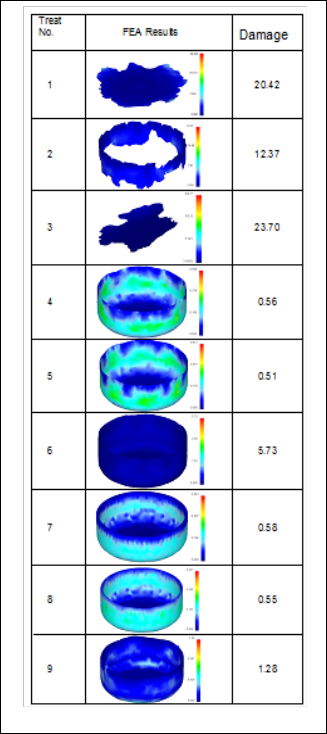
It is clearly observed from figures 19a, (figure 20-1), 19b (figure 20-2) & 19c (figure 20-3) that the damge in the cup was due to low thickness of sheet, high temperature, high coefficent of friction and high strain rate. The result of figure 19a (figure
20-1) was due to thickness, 0.40 mm of the sheet metal. The re- sult of figure 19b (figure 20-2) was due to temperature (3000C) and strain rate (500). The result of figure 19c (figure 20-3) was due to temperature (5000C), high friction coefficient (0.08) and strain rate (1000). Very good quality of cup with test conditions
IJSER © 2015 http://www.ijser.org
International Journal of Scientific & Engineering Research, Volume 6, Issue 4, April-2015 423
ISSN 2229-5518
of treatment 8 (figure 20-8) was resulted (figure 19d). This is also proved with the FEA results as seen in figure 20. The dam- age was observed with treat number 1, 2 &3. With test conditions of treatment 1, 2 & 3 the damages were20.42, 12.37 and 23.70 respectively. In these cases it was also observed that heavy thin- ning was occured near the punch radius.
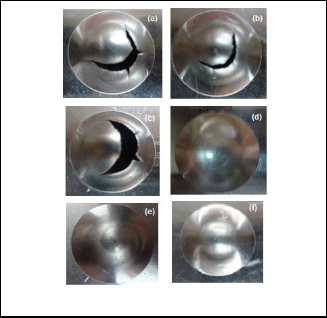
22a, 22b &122c it was observed that 0.40 mm sheets at room temperature, at 3000C and at 5000C show cleavage which was an indication of the damage and the formationn of wrinkles in the cups. From figure 22d there was an indication of forming wrinkles at room temperature for 0.80 mm thick sheets. No wrinkles (figure 22f) were formed at 5000C temperature for

1.50mm thick sheets.

Fig. 21. Influence of temperature on the volume
Fig. 22. Cups drawn on Erichsen deep drawing tester.
Fig. 20. Influence of process parameters on the damage of cups
The effect of temperature on the results of the Erichsen deep drawing test is shown in figure 21. The volume of the cup increases with an increase in the temperature. From figure

4 CONCLUSION
The thickness of sheet, temperature, and coefficient of friction influence the effective stress. The major parameter which can influence volume of the cup is the thickness of sheet. The ef- fective strain and the damage in the cups are affected by sheet thickness, temperature, coefficient of friction and strain rate. The damage in the cups was less in the thick sheets and it was more at high coefficient of friction, strain rate and tempera- ture.
ACKNOWLEDGMENT
The authors wish to thank University Grants Commission
(UGC), New Delhi, India for financail assisting this project.
IJSER © 2015 http://www.ijser.org
International Journal of Scientific & Engineering Research, Volume 6, Issue 4, April-2015 424
ISSN 2229-5518
REFERENCES
[1] K. Chung, F.Barlat and J.C. Brem, Blank shape design for a planar anisot- ropy sheet based on ideal forming design theory and FEM analysis, Inter- national Journal of Mechanical Sciiences, vol. 39, pp.617–633, 1997.
[2] F. Shehata, M.J. Painter, and R. Pearce., Warm forming of alumini- um/magnesium alloy sheet, Journal of Mechanical Working Technology, vol .2, no.3, pp. 279-291, 1978.
[3] D.M. Finch, S.P. Wilson and J.E. Dorn, Deep drawing aluminium alloys at elevated temperatures. Part II. Deep drawing boxes, Transactions ASM, vol.36, pp. 290–310, 1946.
[4] S. Toros S, F.Ozturk and Ilyas Kacar, Review of warm forming of alumi-
num–magnesium alloys, Journal of Materials Processing Technology, vol.207, no.1-3, pp. 1–12, 2008.
[5] J.V.Jeysingh, B. Nageswara Rao , A. Chennakesava Reddy, Investigation
On Failures Of Hydroforming Deep Drawing Processes, Materials Science
Research Journal, vol.2, no.3&4, pp.145-168, 2008.
[6] A. Chennakesava Reddy ,T. Kishen Kumar Reddy, M. Vidya Sagar, Exper- imental characterization of warm deep drawing process for EDD steel, In- ternational Journal of Multidisciplinary Research & Advances in Engineer- ing, vol.4, no.3, pp.53-62, 2012.
[7] A. Chennakesava Reddy, Evaluation of local thinning during cup drawing
of gas cylinder steel using isotropic criteria, International Journal of Engi- neering and Materials Sciences, vol.5, no.2, pp.71-76, 2012.
[8] A. Chennakesava Reddy, Finite element analysis of reverse superplastic blow forming of Ti-Al-4V alloy for optimized control of thickness variation using ABAQUS, Journal of Manufacturing Engineering, vol.1, no.1, pp. 06-
09, 2006.
[9] Chennakesava Reddy, Optimization of Extrusion Process of Alloy 6063
Using Taguchi Technique, International Journal of Multi- Disciplinary Re- search & Advances in Engineering, vol.3, no.2, pp.173-190, 2011.
[10] Chennakesava R Alavala, “CAD/CAM: Concepts and Applications,” PHI Learning Pvt. Ltd., 2008.
[11] Chennakesava R Alavala, “FEM: Basic Concepts and Applications,”
PHI Learning Pvt. Ltd., 2008.
[12] W. Lee and G. W. Yeh, The plastic deformation behaviour of AISI
4340 alloy steel subjected to high temperature and high strain rate loading conditions. Journal of materials processing technology, vol.
71, pp. 224–234, 1997.
[13] H. Kobayash and B. Dodd, A numerical analysis for the formation of adiabatic shear bands including void nucleation and growth, Interna- tional Journal of Impact Engineering, vol.8, pp.1-13, 1989.
[14] J. Hedworth, M.J. Stowell, The measurement of strain-rate sensitivity in superplastic alloys, Journal of Material Science vol.6, pp.1061–
1069, 1971.
[15] A. Wifi and A. Mosallam, Some aspects of BHF schemes in deep drawing process, Journal of Achievements in Materials and Manufac-
turing Engineering vol. 24, no., pp.315-320, 2007.
IJSER © 2015 http://www.ijser.org
