International Journal of Scientific & Engineering Research, Volume 5, Issue 3, March-2014 630
ISSN 2229-5518
Mechanical Design of a New 200 N Force
Standard Machine
Ebtisam H. Hasana, A. M. Khourshidb, M. I. Mohamedc, Salah A. M. Elshourbagyd, and Ahmed A. Hawam*
Abstract— This paper describes des ign, and developm ent of the new 200 N f orc e standard mac hine. The mac hine c ontains two c ompressive f orc e gen eration s ys tems . The first is a deadweight s ystem that c an gener ate f orc es in the range 5-100 N. Th e second is a s ubstitute loading mec hanic al s ystem acts as a c omparator to gener ate f orc es up to 100 N. The two s ys tems are c ombined to gener ate f orc es above 100 N and up to 200 N. T he deadweight s ystem c onsists of a weight stac k, and a loading frame. The s ubs titute loading s ys tem us es a linear loading screw to generat e the s ubstitute f orc e and us es a ref erenc e load c ell to meas ure the f orc e’s value. A height adjustment mec hanis m was added to the mac hine to acc omm odate diff erent sizes of f orc e trans duc ers. T he des ign of all mac hine parts aims to maximize its stiffness , and reduc e error s ourc es.
Index terms— Forc e, dead weight, and subs titute load
—————————— ——————————
1. Introduction
Force measurement plays a vital role in many industrial and research areas. Testing of materials, weighting, monitoring of machine tools, tactile sensors and robotics are only few examples in which precision force measurement are indispensable.
In order to maintain the reliability of force measurement instruments, it should be calibrated periodically using force standard machine, with low uncertainty level in order to provide the traceability in compliance with the international standards.
Different techniques are used to realize force with different levels of uncertainties. The most accurate technique to realize forces is achieved by using dead weights with direct application. However, dead weight machines are very expensive to build and maintain especially at higher capacities. Moreover, it requires a very large building space due to the volume of dead weights.
The technique proposed in this paper is a hybrid system. It works purely by the dead weight action within the low half range of the machine’s capacity and works as a comparator in the other half. The design of the machine tends to push the accuracy level of the comparator section close to the dead weigh class. This research provides a new cheaper design of the substitute load idea [1] to get a compromise between cost and accuracy in high capacity machines.
The machine described in this paper was designed and manufactured according to a research project between the Faculty of Engineering-Tanta University and the Egyptian National Institute for Standards (NIS). The aim of building such machine is mainly to cover the range up to 100 N in compression mode using the direct application of dead weights to transfer the traceability to low capacity force transducers. The machine was also equipped with the newly designed substitute loading system to check its performance.
————————————————
Authors (a & c), National Institute for Standards (NIS), Giza, Egypt
Authors (b & d), Faculty of Engineering, Tanta University, Tanta, Egypt
* Corresponding author:
Faculty of Engineering, Tanta University, Tanta, Egypt
E-mail: ahmed_hawam@f-eng.tanta.edu.eg
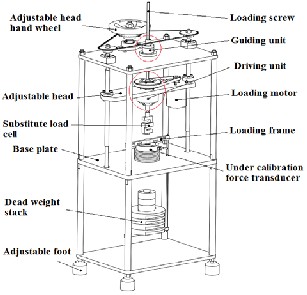
(Figure 1) shows the elements of the new 200 N force standard
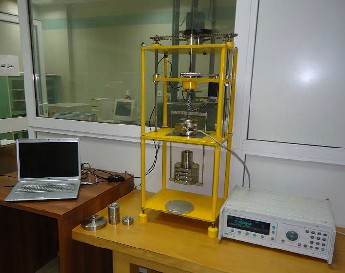
machine. (Figure 2) is a photograph of the new machine. The
machine consists of two stages of a four column frame
assembled together using threaded connections. The upper
and lower stages are sharing the middle steel plate which
represents the base plate. The lower section is the dead weight
part of the machine while the upper section is equipped with
the substitute loading and height adjustment mechanisms.
The machine has 7 main weights made of non magnetic
stainless steel in addition to the loading frame which realizes the first loading step. The combination of dead weights is as follows:
1 × loading frame (5 N), 3 × 5 N, 4 × 20 N
The machine hasn’t any exchange stack gear. So, further 5 × 5
N and 1 × 20 N weights are standby to facilitate the exchange
from and to any loading step without unloading the force

transducer under calibration.
Fig. 1: Main parts of the new 200 N f orc e standard mac hine
2. Machine overview
IJSER © 2014 http://ww w .ij s er.org
International Journal of Scientific & Engineering Research, Volume 5, Issue 3, March-2014 631
ISSN 2229-5518

Fig. 2: T he new 200 N f orc e standard mac hine
3. The loading frame
The loading frame carries the dead weights and transfers the load to the force transducer under calibration. The designed frame consists of an upper strip, a lower strip and two frame columns that connect upper and lower strips together. The lower strip carries the dead weights while the upper strip contacts directly with the force transducer under calibration. All parts of the loading frame were made of high strength non magnetic stainless steel to guarantee its reliability.
4. Substitute loading mechanism
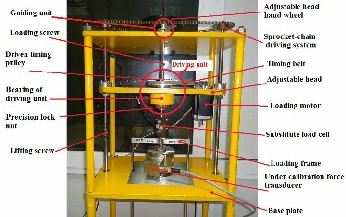
(Figure 3) is a photograph of the substitute loading mechanism. It is considered as a rotating nut power screw, in which the loading screw moves linearly in a precise vertical guiding unit. A reference load cell is attached to the short end of the loading screw to measure the substitute force precisely. The loading power is delivered from a high resolution, high precision and low vibration micro stepping motor unit. The power transfers from the loading motor to the driving unit through a timing belt connection with 1:4 transmission ratio.
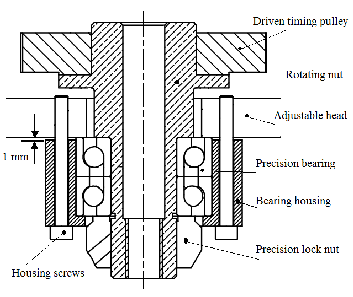
The role of the driving unit shown in (Figure 4) is receiving the loading power from the motor and delivers it to the loading screw. The driving unit consists of a driven timing pulley secured firmly to a custom designed rotating nut by six screws (not shown). The assembly is mounted on two angular contact ball bearings paired back-to-back. The bearing arrangement provides both axial and radial location.
The bearings were selected with light preload feature. Such feature quarantine zero internal clearance and subsequently zero axial play if light preload is applied on the stationary bearing’s race [2]. To apply a preload force, the bearing housing was made 1mm shorter than the height of the two paired bearing. So, by adjusting the tighten torque of the housing screws, a preload force can be applied to the stationary outer race of the bearing. Moreover, a precision lock nut is used to tighten the rotating nut against the internal rotating race of the bearing.

The great concern on rigidity in design and assembly is reasonable because, any small or insensible axial play can cause large measurement errors or readings instability.
Fig. 4: Des ign of the driving unit
4.2. Driving motor
The precision of the substitute loading mechanism depends mainly on the driving motor. The motor was selected to be a 5 phase stepping motor with micro stepping control feature. The minimum stepping angle θ of the motor is 0.00144° which means that a single revolution needs a 250000 step. By considering the pitch of the loading screw P is 2mm and the transmission ratio between the driving unit and loading motor r is 1:4, the resulting minimum controlled linear motion step S can be derived as the following:


s = p

= 2mm
= 2 ×10⁻⁶ mm / step = 2nm / step
360°

θ × r
360°
Fig. 3: Elem ents of the s ubstitute load s ys tem


0.00144 (° / step ) × 1
4.1. Driving unit
4
IJSER © 2014 http://ww w .ij s er.org
International Journal of Scientific & Engineering Research, Volume 5, Issue 3, March-2014 632
ISSN 2229-5518
The minimum controlled linear step is 2nm which is much more sufficient to get good control of the applied load. Moreover, the reference load cell was selected to be from S type with large full scale deflection (0.25 – 0.5mm) to enhance the system resolution.
4.3. Guiding unit

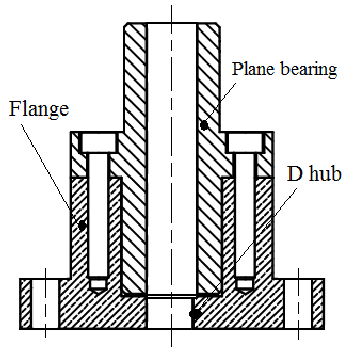
Since any inclination in the loading screw can cause measurement errors, the guiding unit takes its role and guarantees the precise vertical movement of the loading screw. The guiding unit (Figure 5) is a combination of a custom designed flange and a high precision plane bearing. The flange has a D shaped hub that mate with a D section in the loading screw to prevent it from rotation. In the same time, the designed flange has the correct and precise locater of the plane bearing. The plane bearing is a high quality ready made unit with special features. The bearing length is large enough to provide sufficient guidance. Also, the bearing internal coating material acts as a vibration damper [3] which is very useful for accurate and stable read out.
Fig. 5: Des ign of the guiding unit
5. Height adjustment mechanism
The stroke of the loading screw isn’t long enough to accommodate different sizes of force transducers to be calibrated. So, the loading screw, loading motor and the driving unit are mounted on an adjustable head to provide the system with the flexibility required to handle different sizes of force transducers.
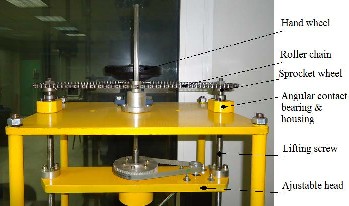
The head level can be adjusted via the height adjustment mechanism shown in (Figure 6). The designed mechanism consists of two lifting screws, a sprocket-chain drive system, and hand wheel. The lifting screws carry the weight of the adjustable head and its mounted components. Also, the lifting screws are used to drive the adjustable head. So, each lifting screw is attached to a sprocket wheel. A manually operated
hand wheel is used to drive the lifting screws and subsequently the adjustable head using the sprocket-chain driving system.
The lifting screw is supported at two points. At the first one, two angular contact ball bearings paired back-to-back are used for axial location. Like the case of the driving unit, the bearings were selected with light preload feature. So, the bearing housing was made 1mm shorter than the height of the two paired bearing to apply a preload force to the stationary outer race of the bearing. Also, a precision lock nut is used to tighten the lifting screw against the internal rotating race of the bearing. At the second supporting point, a single row deep grove ball bearing is used as a floating bearing to locate the lifting screw in the radial direction.
When the required level of the adjustable head is achieved, two nuts are used to lock the lifting screws and subsequently the adjustable head from moving which provide a high rigid loading platform.

Fig. 6: Height adjustment mec hanis m
6. Operating principle
Depending on the required force step, the force generation mode is determined. The dead weight mode can generate forces from 5 to 100 N. The substitute loading mechanism is involved when the required force step exceeds 100 N and up to 200 N.
6.1. Dead weight mode
In this mode the forces is generated purely by the dead weights. The appropriate combination of deadweights is determined from the beginning to generate the required force steps.
When calibrating a force transducer, the force steps and its corresponding weigh combinations are selected in a manner that can be achieved in increasing forces only without unloading. By this way, the lack of an exchange stack mechanism in the machine can be compensated.
6.2. Combined deadweight and substitute loading
mode
When the required force step exceeds 100 N, the substitute loading system takes its role. Firstly, the force transducer under calibration is loaded by the full capacity of dead weighs (100 N). Then, the loading screw moves towards the loading frame until the substitute load cell makes contact with it. The loading screw continues the moving action until the required
IJSER © 2014 http://ww w .ij s er.org
International Journal of Scientific & Engineering Research, Volume 5, Issue 3, March-2014 633
ISSN 2229-5518
load is achieved. The set point in which the loading
mechanism will stop loading equals the target force step minus the fully loaded dead weight capacity (100 N). Any increase or decrease of force above 100 N will be achieved purely by the substitute loading mechanism.
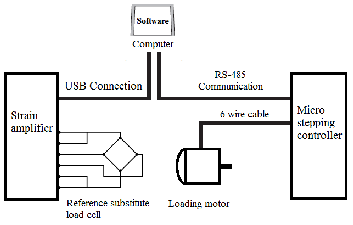
The substitute load force measuring system consists of the substitute load cell, strain amplifier and PC-based software. The system was calibrated against dead weights according to ISO 376:2011 [4] before its installation and the calibration data stored permanently to the computer. In real operation, the software receives the amplified signal and represents it in force units depending on the stored calibration data.
The control of the loading mechanism is done using the micro stepping motor controller and special PC software. The connection between the loading mechanism and substitute load measuring system depends on the human element.

Fig. 7: Connec tions of s ubstitute loading s ys tem instruments
7. Conclusion
A newly designed 200 N force standard machine with a complementary substitute loading system was developed. The machine can generate compressive forces from 5 N to 100 N by the pure deadweight system. The complementary substitute loading system can generate compressive forces up to 100 N. The two systems are combined to generate forces that exceed the deadweight’s capacity and up to 200 N.
The substitute loading mechanism was designed to generate force by the action of a linear loading screw. The design paid great concern on rigidity and vertical alignment criteria to prevent measurement errors and load instability. Moreover, the minimum linear step of the loading screw was determined as 2nm which provide good control of the load.
The machine was equipped with a height adjustment mechanism to accommodate different sizes of force transducers. The mechanism was designed in such way that doesn’t affect the rigidity of the machine.
Future work
Future investigations will be carried out on the uncertainty sources related to the new machine. Then, a comparison between the new machine and another appropriate force standard machine will be held to realize the estimated uncertainty.
Acknowledgement
The authors would like to thank TEDATA GMBH Company for support Ahmed A. Hawam by a free license of the valuable MDESIGN mechanical calculations software. Design calculations in this project were performed using MDESIGN
2012.
References
[1] Dr. T. Allgeier, Prof. H. El-Hakeem, Prof. A. El-Sayed, and Dipl.
Ing. B. Glöckner, “A New Design of Deadweight Force Standard Machine with Substitute Load Control and Self-checking Systems”, IMEKO, Proceedings of the 17th International Conference on Force, Mass, Torque and Pressure Measurements, TC3, Istanbul, Turkey, (2001)
[2] www.skf.com
[3] Simplicity® Technical Guide, Linear Plane Bearing, PBC LINEAR Co. , USA
[4] ISO 376:2011, Metallic materials - Calibration of force-proving instruments used for the verification of uniaxial testing machines, International Organization for Standardization, (2011)
IJSER © 2014 http://ww w .ij s er.org
